
Can I mold a football mouthpiece at home? Yes, you can easily mold a football mouthpiece at home using the common “boil and bite” method. This process allows you to create a personalized fit, which is crucial for comfort, protection, and effective communication on the field. A well-fitted mouthguard not only prevents dental injuries but also improves athletic performance by allowing you to breathe and speak clearly. This guide will walk you through the steps of fitting a football mouthguard to ensure optimal sports mouthguard preparation and enhance your football safety equipment molding.
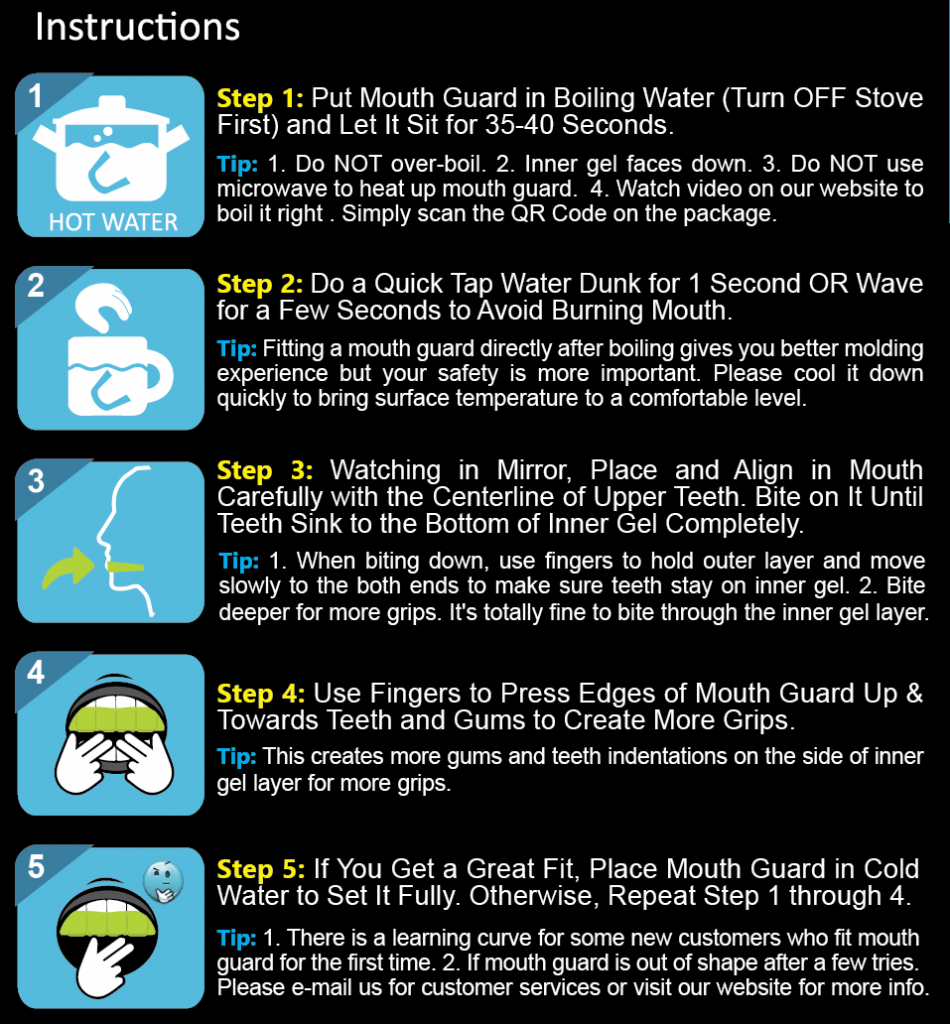
Image Source: www.oralmart.com
Why a Proper Fit Matters
A football mouthpiece isn’t just a piece of plastic; it’s a vital piece of football safety equipment. A ill-fitting mouthguard can be more dangerous than no mouthguard at all. It can:
- Hinder breathing: A bulky or improperly molded guard can restrict airflow, impacting stamina and performance.
- Obstruct speech: You need to be able to communicate with teammates. A poor fit can make this difficult or impossible.
- Cause discomfort: Chafing, gagging, or a constant need to adjust the guard is distracting and unpleasant.
- Offer less protection: If the mouthpiece doesn’t cover your teeth and gums properly, it won’t absorb impacts effectively.
Achieving a snug, comfortable fit is key to ensuring your mouthguard does its job. This is where the boil and bite mouthpiece technique excels, offering a custom mouthguard fitting at home.
The Science Behind Molding: Thermoplastic Mouthguards
Most affordable and accessible sports mouthguards are made from thermoplastic mouthguard materials. These materials are designed to soften when heated and then harden as they cool, allowing them to be shaped to the unique contours of your mouth. This process is the foundation of creating a custom mouthguard. When you heat the mouthguard, the plastic becomes pliable, like warm wax. As you bite down and mold it, the plastic wraps around your teeth and gums, capturing their shape. Once it cools, it solidifies in this new form, providing a snug, personalized fit. This method is a far cry from simply wearing an ill-fitting, generic guard. The goal of molding dental guard materials for sports is to create a barrier that is both protective and functional.
Preparing for the Molding Process
Before you start sports mouthguard preparation, gather all the necessary items. Having everything ready will make the process smoother and help you achieve the best possible fit.
Essential Supplies
- Your Boil and Bite Mouthpiece: Ensure it’s clean and free from any packaging.
- Boiling Water: You’ll need a pot or kettle to boil water.
- A Heat-Resistant Bowl: A glass or ceramic bowl works well to hold the hot water.
- A Timer: Precision is important for the heating and cooling stages.
- A Spoon or Tongs: To safely handle the hot mouthguard.
- A Glass of Cold Water: For a quick rinse after molding.
- A Mirror: To check the fit afterward.
- A Sharp Knife or Scissors (Optional): For trimming excess material if needed, though this is rarely necessary with proper molding.
Pre-Molding Checks
- Read the Manufacturer’s Instructions: Every heat moldable sports mouthguard might have slightly different recommendations for water temperature and molding time. Always check the packaging first.
- Cleanliness is Key: Ensure your hands and the area where you’ll be working are clean.
- Check the Mouthguard: Make sure the mouthguard you’re about to mold is suitable for your sport and isn’t damaged.
Step-by-Step Molding Guide
Follow these steps carefully to achieve a superior fit for your football mouthpiece. This process is straightforward and effective for custom mouthguard fitting.
Step 1: Boiling the Water
- Fill a pot or kettle with enough water to fully submerge the mouthguard.
- Bring the water to a rolling boil.
- Once boiling, carefully remove the pot from the heat. If using a kettle, pour the boiling water into your heat-resistant bowl.
- Important Safety Note: Water that is too hot can melt or damage the mouthguard. The ideal temperature is usually around 160-170°F (71-77°C). Let the boiling water sit for about 30-60 seconds after removing it from the heat to reach this temperature range.
Step 2: Softening the Mouthguard
- Using a spoon or tongs, gently place the mouthguard into the hot water.
- Ensure the mouthguard is fully submerged.
- Timing is Crucial: Most mouthguards need to be in the hot water for approximately 30 to 60 seconds. Again, refer to your specific product’s instructions. Overheating can make the material too flimsy, while underheating will prevent proper molding.
- The mouthguard should become soft and pliable. It will lose its rigidity.
Step 3: Removing and Draining
- Carefully remove the softened mouthguard from the hot water using your spoon or tongs.
- Gently shake off any excess water.
- Cool Slightly: Allow the mouthguard to cool for a few seconds on your finger or a clean surface. It should be warm, but not so hot that it burns your mouth. This is a critical part of fitting a football mouthguard safely.
Step 4: Molding the Mouthguard
This is the most important part of creating a custom mouthguard.
- Positioning: Open your mouth and place the mouthguard onto your upper teeth. Ensure it is centered and covers your front teeth and as much of your gums as possible.
- Bite Down: Gently bite down into the mouthguard. Don’t bite too hard, as you can bite through the softened material. You want to apply even pressure.
- Use Your Fingers and Tongue:
- Use your fingers to press the mouthguard against your teeth and gums from the outside.
- Use your tongue to push the mouthguard against the roof of your mouth and the inside of your teeth.
- Suck in to create a vacuum and draw the material more tightly around your teeth.
- Hold the Shape: Maintain this pressure for at least 30-60 seconds, or until the mouthguard feels firm. This allows the thermoplastic mouthguard to set into its new shape.
Step 5: Cooling and Finishing
- Once you’ve held the shape for the recommended time, carefully remove the mouthguard from your mouth.
- Immediately immerse it in the glass of cold water. This helps it to harden quickly and set the mold permanently.
- Let it cool completely in the water for a minute or two.
- Try the mouthguard back in your mouth. It should feel snug and secure.
Checking the Fit: What to Look For
A successful molding session results in a mouthguard that feels like a part of your mouth. Here’s what to assess:
- Snugness: Does it stay in place when your mouth is open? It shouldn’t fall out.
- Comfort: Are there any sharp edges or areas that dig into your gums? It should feel smooth and comfortable.
- Coverage: Does it cover your teeth and a portion of your gums effectively?
- Breathing: Can you breathe comfortably through your nose and mouth?
- Speech: Can you speak clearly enough to communicate with your team?
- Gagging: Does it make you gag? A proper fit should minimize this.
If the fit isn’t perfect, don’t worry. Most heat moldable sports mouthguard products can be remolded. You might need to repeat the process.
Troubleshooting Common Fitting Issues
Sometimes, the first attempt at molding dental guard materials doesn’t yield a perfect result. Here are common problems and how to fix them:
Mouthguard Falls Out
- Issue: The mouthguard is too loose and doesn’t stay in place.
- Solution: You likely didn’t bite down firmly enough or hold the shape long enough during the molding process. Try remolding, focusing on biting down with moderate pressure and using your tongue to press the material against the roof of your mouth and the inside of your teeth. Suction can also help.
Gagging Reflex
- Issue: The mouthguard is too long or bulky and triggers your gag reflex.
- Solution: For some boil and bite mouthpiece designs, you can trim a small amount off the back of the mouthguard with a sharp knife or scissors. However, proceed with extreme caution. Only trim a tiny bit at a time, and ensure you don’t compromise the protective qualities of the guard. It’s often better to try remolding first, focusing on pushing the material upwards as much as possible.
Discomfort or Pressure Points
- Issue: The mouthguard feels tight in some spots or has sharp edges.
- Solution: This often happens if you bit down too hard or didn’t mold it evenly. You can try to gently soften just the offending area with hot water (use a spoon to apply hot water directly to that spot for a few seconds) and then remold it by biting down and pressing that specific area with your finger. For sharp edges, you can try gently smoothing them with warm water and your finger.
Uneven Molding
- Issue: The mouthguard isn’t molded evenly around all your teeth.
- Solution: This could be due to uneven biting pressure or not using your tongue effectively. Remold the mouthguard, ensuring you apply pressure evenly across the entire surface. Use your tongue to push the material against the back of your teeth and the roof of your mouth.
Remolding Your Mouthguard
If your initial custom mouthguard fitting isn’t quite right, most boil and bite mouthpiece products are designed for remolding.
- Prepare: Start again by boiling fresh water and preparing your workspace.
- Soften: Submerge the already-molded mouthguard in the hot water for the recommended time (often slightly longer than the initial molding, around 60-90 seconds, but check instructions).
- Remold: Remove the mouthguard, allow it to cool slightly, and re-insert it into your mouth. Bite down, use your fingers and tongue to press it into the desired shape, and hold until firm.
- Cool: Rinse in cold water.
You can usually remold a mouthguard 2-3 times. However, repeated heating can eventually degrade the material, so try to get it right on your first or second attempt.
Maintaining Your Molded Mouthguard
Proper care ensures your mouthguard remains hygienic and protective.
Cleaning
- After Each Use: Rinse your mouthguard thoroughly with cool water.
- Regular Cleaning: Use a soft-bristled toothbrush and mild, non-abrasive toothpaste or a specialized mouthguard cleaner. Avoid harsh chemicals or hot water, which can damage the material.
- Drying: Allow the mouthguard to air dry completely before storing it.
Storage
- Ventilated Case: Store your mouthguard in its original case or a ventilated case designed for mouthguards. This prevents moisture buildup, which can lead to odor and bacterial growth.
- Avoid Heat: Do not store your mouthguard in direct sunlight or hot environments (like a car dashboard), as this can warp the plastic.
Replacement
Even with proper care, mouthguards degrade over time. Replace your mouthguard:
- Annually: It’s generally recommended to replace your mouthguard every season or at least once a year.
- If Damaged: If you notice cracks, tears, or significant wear and tear, replace it immediately. A damaged mouthguard offers compromised protection.
- If Fit Changes: If your teeth have shifted or the mouthguard no longer fits snugly, it’s time for a new one.
When to Consider a Professional Dental Mouthguard
While the boil and bite mouthpiece method is excellent for most athletes, there are instances where a custom-fit, professionally made mouthguard might be preferable. These are often referred to as dental impression mouthguard devices.
Advantages of Professional Mouthguards
- Superior Fit: Made from impressions taken by a dentist, these mouthguards offer the most precise and comfortable fit possible.
- Enhanced Protection: Dentists can create mouthguards with specific thicknesses and designs tailored to your sport and individual needs, offering maximum impact absorption.
- Better Breathing and Communication: Their precise fit can lead to even better airflow and clearer speech compared to even a well-molded boil-and-bite guard.
- Durability: Professionally made mouthguards are often more durable and can last longer than over-the-counter options.
When to Seek Professional Help
- Braces: If you have braces, a custom-fit mouthguard is highly recommended. A dentist can create a guard that fits over your braces and protects both your teeth and the orthodontic hardware.
- TMJ Issues: If you have temporomandibular joint (TMJ) disorders, a dentist can craft a mouthguard that helps alleviate pressure and discomfort.
- Frequent or High-Impact Sports: For athletes in sports with extreme contact or those who have a history of dental injuries, a professional mouthguard might offer a higher level of protection.
- Difficulty Achieving a Good Fit: If you’ve tried multiple boil-and-bite mouthguards and still can’t get a satisfactory fit, a dental impression is the next logical step.
The process of obtaining a dental impression mouthguard involves a visit to your dentist. They will take impressions of your teeth, which are then sent to a dental laboratory to create your custom guard. While more expensive, the unparalleled fit and protection are often worth the investment for serious athletes.
Frequently Asked Questions (FAQ)
Q1: How long does a molded mouthguard last?
A1: A properly cared-for boil-and-bite mouthguard typically lasts for one sports season. However, it’s best to replace it if it shows signs of wear, damage, or if your teeth have shifted.
Q2: Can I mold a mouthguard for my lower teeth?
A2: Most boil-and-bite mouthguards are designed for the upper teeth, as this is where the primary impact protection is needed. While it’s technically possible to mold some for the lower teeth, it’s generally not recommended for football due to the risk of dislodging them and potential airway obstruction. Always use mouthguards as intended by the manufacturer.
Q3: What is the best water temperature for molding a mouthguard?
A3: The ideal temperature is usually between 160-170°F (71-77°C). Avoid using water that is too hot, as it can melt the material. Letting boiling water sit for about 30-60 seconds after removing it from the heat usually brings it to the correct temperature. Always check the manufacturer’s specific instructions.
Q4: Is it okay to trim my mouthguard?
A4: Yes, in some cases, you may need to trim a small amount off the back of the mouthguard if it’s too long and causes gagging. Use a sharp knife or scissors and trim only a tiny bit at a time. Be very careful not to cut into the main protective area of the mouthguard. It’s often better to try remolding first.
Q5: What’s the difference between a boil and bite and a custom-fit mouthguard?
A5: A “boil and bite” mouthguard is a thermoplastic device you heat and mold yourself at home for a semi-custom fit. A custom-fit mouthguard is made by a dentist based on an impression of your teeth, offering a precise, superior fit and often enhanced protection.
Conclusion
Mastering the art of fitting a football mouthguard is a straightforward yet critical skill for any player. By following the sports mouthguard preparation and molding steps for your boil and bite mouthpiece, you can achieve a comfortable, secure, and protective fit. This attention to detail in your football safety equipment molding ensures you can focus on the game, knowing your teeth and gums are shielded. Remember that proper maintenance and timely replacement are also key to maximizing the effectiveness of your thermoplastic mouthguard. For the ultimate in protection and comfort, consider a dental impression mouthguard from your dentist, especially if you have braces or unique dental needs. A well-fitted mouthguard is an investment in your safety and your game.