
Image Source: www.oralmart.com
How To Mold A Football Mouthguard Properly: Easy At-Home Guide
Can I mold a football mouthguard at home? Yes, you can mold many football mouthguards at home, typically referred to as boil and bite mouthguard types, with simple household items. This guide will walk you through the straightforward process of achieving a custom fit mouthguard for optimal protection and comfort. A properly fitted mouthguard is essential sports protective gear that significantly aids in preventing dental injuries on the field. This guide ensures you know proper mouthguard use from the very start of its life.
Why a Proper Fit Matters for Your Mouthguard
When you’re on the football field, the impact can be intense. That’s why having a well-fitting mouthguard isn’t just a recommendation; it’s crucial for safeguarding your smile. A loose mouthguard can shift during play, leaving your teeth exposed to damage. It can also make it difficult to breathe or speak, which can impact your performance.
A heat moldable mouthguard that’s molded correctly offers several key benefits:
- Superior Protection: It creates a snug barrier around your teeth, absorbing and distributing the force of impact away from your teeth and jaw. This is vital for preventing dental injuries like chipped teeth, broken teeth, or even jaw fractures.
- Enhanced Comfort: When it fits just right, you’ll barely notice it’s there. This means you can focus on the game, not on readjusting an uncomfortable piece of equipment.
- Improved Breathing and Speech: A correctly molded mouthguard won’t obstruct your airway or your ability to communicate with teammates.
- Better Grip: A snug fit can also help prevent the mouthguard from falling out during play.
While professional, lab-created mouthguards using a dental impression kit offer the ultimate in custom fit, a properly molded boil and bite mouthguard can provide excellent protection for most athletes, especially when you learn the mouthguard molding process thoroughly.
Getting Started: What You’ll Need
Before you begin the mouthguard molding process, gather these simple items. Having everything ready will make the fitting a sports mouthguard experience smooth and successful.
- Your Boil and Bite Mouthguard: Ensure it’s a quality product designed for contact sports like football.
- Pot or Saucepan: For heating water.
- Water: Enough to fully submerge the mouthguard.
- Slotted Spoon or Fork: To safely remove the hot mouthguard from the water.
- Bowl of Cold Water: For cooling the mouthguard after molding.
- Mirror: To help you see what you’re doing.
- Clean Towel: For drying your hands and mouthguard.
- Timer or Watch: To keep track of the heating time.
Step-by-Step Guide to Molding Your Mouthguard
Follow these steps carefully to achieve a safe and effective fit. This heat moldable mouthguard process is designed for ease and results in excellent sports protective gear.
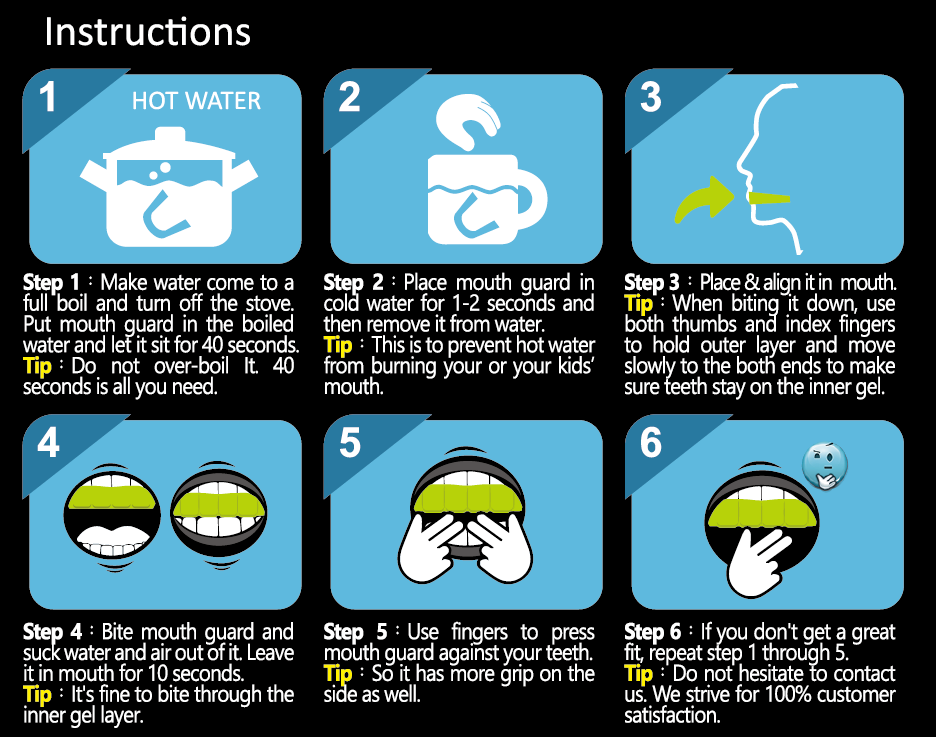
Step 1: Prepare the Water
- Fill the Pot: Pour enough water into your pot or saucepan to completely cover the mouthguard.
- Heat the Water: Place the pot on the stove and bring the water to a rolling boil. Once it’s boiling, reduce the heat slightly to maintain a strong simmer. You don’t want it to boil over, but you need the water hot enough to soften the dental thermoplastic of the mouthguard.
- Safety First: Always be cautious when handling hot water and hot equipment.
Step 2: Soften the Mouthguard
- Careful Submersion: Using your slotted spoon or fork, carefully place the mouthguard into the simmering water.
- Timing is Key: Let the mouthguard soften for the time recommended by the manufacturer. This is typically between 30 seconds to 1 minute. Overheating can damage the material, while underheating won’t allow it to mold properly.
- Visual Check: The mouthguard should become pliable and slightly translucent.
Step 3: Remove and Cool Slightly
- Gentle Removal: Carefully lift the softened mouthguard out of the hot water with your spoon or fork.
- Cooling Period: Let it cool for a few seconds. You want it hot enough to mold but not so hot that it burns your mouth. A common recommendation is to wait about 10-15 seconds. You can test the temperature on your fingertip if you’re unsure.
Step 4: Positioning for Molding
- Bite Down: With the mouthguard in your mouth, bite down firmly. You want to close your teeth together, but not so hard that you push all the material out the sides.
- Use Your Fingers: While biting, use your fingers to press the mouthguard firmly against your teeth. Mold it around the front, sides, and back surfaces of your teeth. Pay special attention to the biting surfaces and the gum line.
- Tongue Pressure: Use your tongue to press the mouthguard against the roof of your mouth and the insides of your teeth. This helps create a secure, custom fit.
- Suck In: Gently suck in your cheeks to create a vacuum. This helps the dental thermoplastic adhere to your teeth and gums.
Step 5: Hold the Position
- Maintain Pressure: Hold this position firmly for at least 30 seconds to 1 minute. This allows the mouthguard to set in its molded shape.
- Breathe Through Your Nose: Try to breathe through your nose during this molding period.
Step 6: Cool and Set
- Remove Mouthguard: Carefully remove the mouthguard from your mouth.
- Cold Water Bath: Immediately place the molded mouthguard into the bowl of cold water. This helps it harden and retain its shape. Leave it in the cold water for a minute or two.
Step 7: Check the Fit and Repeat if Necessary
- Try it On: Once cooled, place the mouthguard back into your mouth.
- Evaluate the Fit: It should feel snug and secure. Your teeth should be comfortably seated within the molded impressions. It shouldn’t easily fall out when you open your mouth.
- Comfort Check: You should be able to speak and breathe comfortably.
- Adjustments: If the fit isn’t perfect, don’t worry. Most boil and bite mouthguard types can be remolded. Simply repeat the process from Step 1. You might need a couple of tries to get it just right. Avoid overheating or excessive biting, as this can distort the mouthguard.
Important Considerations for Proper Mouthguard Use
Mastering the mouthguard molding process is the first step. To ensure long-term effectiveness and safety, keep these points in mind for proper mouthguard use:
- Read Manufacturer Instructions: Always refer to the specific instructions that come with your mouthguard. Different brands and materials might have slightly different molding times or techniques.
- Cleanliness is Crucial: Before and after each use, rinse your mouthguard with cool water. You can also clean it with a soft toothbrush and mild soap or a specialized mouthguard cleaner. Avoid using toothpaste, as it can be abrasive.
- Storage: Store your mouthguard in a clean, dry, and well-ventilated case. This prevents bacterial growth and damage. Don’t leave it in a sweaty gear bag.
- Replacement: Mouthguards don’t last forever. Replace your mouthguard if it becomes worn, torn, or develops holes, as its protective capabilities will diminish. Generally, consider replacing it at the start of each season or if you notice any damage.
- Individual Needs: While a boil and bite mouthguard is a great option, some athletes might have specific dental needs or require a more specialized fit. In such cases, consulting with a dentist about a professionally made mouthguard (often created from a dental impression kit) is the best course of action.
Troubleshooting Common Molding Issues
Sometimes, despite best efforts, the fit might not be perfect on the first try. Here are some common issues and how to address them:
- Mouthguard is Too Loose:
- Cause: Not biting down firmly enough or not using enough tongue/cheek pressure during molding.
- Solution: Remold, ensuring you apply significant pressure with your teeth, tongue, and cheeks. Suck in firmly to create a vacuum.
- Mouthguard Feels Too Tight or Restrictive:
- Cause: Over-molding or biting down too hard, pushing the material too thin in some areas.
- Solution: Remold, but be gentler with your bite. Focus on creating the shape without compressing the material excessively. Ensure you’re not biting through the softened material.
- Material is Uneven or Bulky:
- Cause: The material didn’t soften evenly or wasn’t molded symmetrically.
- Solution: Remold, ensuring the mouthguard is fully submerged and softened evenly. Take extra care to smooth out the material evenly with your fingers and tongue.
- Difficulty Breathing or Speaking:
- Cause: The mouthguard is too large or has been molded in a way that obstructs airways.
- Solution: Remold, making sure to leave enough space for your tongue and to keep the front section from being overly thick. Focus on molding the outer surfaces and biting edges primarily.
When to Consider a Professional Dental Mouthguard
While the boil and bite mouthguard is an excellent and accessible option for sports protective gear, there are instances where a professionally made mouthguard is superior. If you have braces, significant dental work (like crowns or bridges), or a history of jaw issues, a custom-fit mouthguard created from a dental impression kit by your dentist is highly recommended. These mouthguards are precisely crafted to your unique dental anatomy, offering the highest level of comfort and protection. They are often made from advanced dental thermoplastic materials that offer superior shock absorption.
A dentist can also assess your specific needs for fitting a sports mouthguard and ensure it integrates seamlessly with any orthodontic appliances or dental restorations, further enhancing preventing dental injuries.
The Science Behind the Fit: Dental Thermoplastics
The materials used in boil and bite mouthguard products are known as dental thermoplastics. These are special plastics that have the ability to soften when heated and then harden again when cooled. When you immerse the mouthguard in hot water, the molecules within the dental thermoplastic gain enough energy to move past each other, making the material flexible and pliable.
During the molding process, when you apply pressure with your teeth, tongue, and fingers, you are essentially forcing the softened plastic to conform to the unique contours of your teeth and gums. As the mouthguard cools, the molecules settle back into a more rigid structure, locking in that custom shape. This is what gives you a snug and protective fit, ensuring it stays in place and offers maximum impact absorption. The effectiveness of the mouthguard molding process relies on the unique properties of these dental thermoplastics.
Enhancing Performance with a Proper Fit
A well-molded mouthguard isn’t just about preventing injuries; it can also contribute to your performance on the field. When you’re not constantly adjusting a loose or uncomfortable mouthguard, you can focus more intently on your game. Clear breathing and the ability to communicate effectively with your teammates are essential in football. A mouthguard that fits properly facilitates both, allowing you to stay in the zone and perform at your best. This attention to detail in fitting a sports mouthguard can make a difference in critical game moments.
Long-Term Dental Health and Mouthguards
Consistent and proper use of a mouthguard throughout your football career is a significant investment in your long-term dental health. Preventing dental injuries goes beyond just avoiding immediate pain and discomfort; it means preserving your natural teeth, preventing the need for costly and extensive dental procedures down the line, and avoiding potential complications like jaw disorders.
Remembering the importance of proper mouthguard use, including regular cleaning and replacement, ensures that this vital piece of sports protective gear continues to offer reliable protection season after season.
Frequently Asked Questions (FAQ)
Q1: How often should I replace my football mouthguard?
A1: It’s generally recommended to replace your mouthguard at least once a year, or at the beginning of each sports season. You should also replace it immediately if it shows any signs of wear and tear, such as tears, thinning, or becoming loose.
Q2: Can I use a regular mouthguard for football?
A2: No, it’s important to use a mouthguard specifically designed for contact sports like football. These are made from more durable materials and offer better protection against impact. Generic or less robust mouthguards may not provide adequate safety.
Q3: What’s the difference between a boil and bite mouthguard and a custom-fit mouthguard?
A3: A boil and bite mouthguard is designed to be softened in hot water and molded at home by the user. A custom-fit mouthguard is professionally made by a dentist or dental lab, usually from an impression taken of your teeth using a dental impression kit. Custom-fit mouthguards generally offer a superior fit and comfort, but boil and bite mouthguards are a highly effective and more affordable option when molded properly.
Q4: My mouthguard feels bulky. How can I make it slimmer?
A4: When molding, try to use your tongue to press the material firmly against the roof of your mouth and the inside of your teeth. Also, gently suck in your cheeks to create a vacuum, which helps the material conform tightly to your teeth and reduces bulk. If it’s consistently too bulky after a few attempts, the mouthguard might be too large for your mouth or the material may not be designed for a very streamlined fit.
Q5: Is it safe to remold a mouthguard multiple times?
A5: Most heat moldable mouthguard products can be remolded 2-3 times without significant degradation of the material. However, avoid overheating the mouthguard, as this can weaken the dental thermoplastic and compromise its protective qualities. Follow the manufacturer’s guidelines for remolding.
Q6: Can I mold a mouthguard if I have braces?
A6: Molding a mouthguard with braces can be tricky. Some boil and bite mouthguard products are designed for use with braces, often referred to as “orthodontic mouthguards.” These typically have a special channel or opening to accommodate the brace brackets. Always check the product packaging or consult with your orthodontist before attempting to mold a mouthguard with braces. A custom-made orthodontic mouthguard from your orthodontist is often the safest and most effective option.
Q7: How do I clean my football mouthguard?
A7: After each use, rinse your mouthguard thoroughly with cool water. You can also gently scrub it with a soft toothbrush and mild soap. Specialized mouthguard cleaning solutions are also available. Allow it to air dry completely before storing it in its protective case.
Q8: My mouthguard keeps falling out during play. What did I do wrong?
A8: This usually means the fit isn’t snug enough. During the molding process, ensure you bite down firmly, use your tongue to press the material against your teeth and the roof of your mouth, and suck in your cheeks to create a vacuum. Holding the position for the recommended time is also critical for a secure fit. If it continues to happen, try remolding, focusing on these steps.
Q9: What does “boil and bite” mean?
A9: “Boil and bite” refers to a type of mouthguard made from a dental thermoplastic material that softens when immersed in boiling or hot water. Once softened, it can be molded to the user’s teeth by biting down and applying pressure.
Q10: Is a mouthguard necessary for practice, not just games?
A10: Yes, it is highly recommended to wear a mouthguard during all football practices, not just games. Many impacts and potential injuries occur during practice drills. Proper mouthguard use should be a habit for every time you’re on the field.