
Can you frame a football shirt at home? Absolutely! Framing a football shirt at home is a rewarding project that allows you to showcase your passion for the sport and preserve a piece of sporting history. This guide will walk you through everything you need to know to create a stunning football shirt display, whether you’re a seasoned DIYer or a complete beginner. We’ll cover the essentials of jersey framing, from selecting the right materials to the final touches that elevate your sports memorabilia framing.
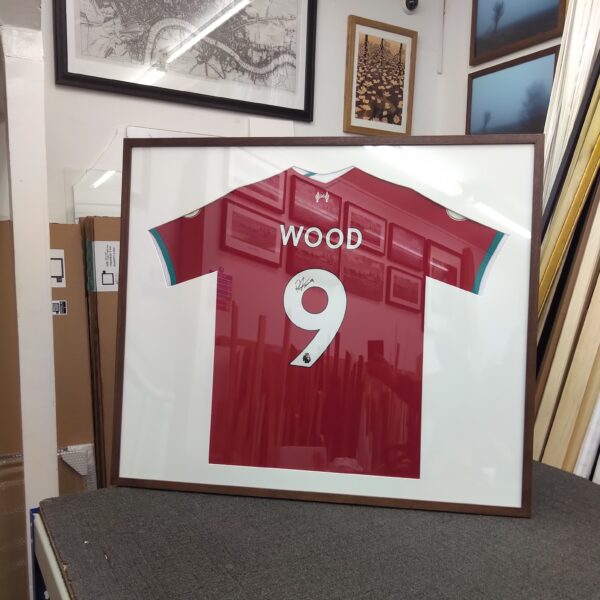
Image Source: www.sohoframes.co.uk
Why Frame a Football Shirt?
A framed football shirt is more than just a piece of fabric on a wall; it’s a tangible connection to memorable moments, beloved players, and the thrill of the game. It can commemorate a specific match, a championship victory, a personal achievement, or simply your enduring fandom. Proper framing not only protects your treasured jersey from dust, fading, and damage but also transforms it into a focal point of your décor. Whether it’s a vintage classic or a modern replica, a framed soccer jersey adds character and personality to any room.
Celebrating Sporting Achievements
- Personal Triumphs: Did you score the winning goal? Frame the shirt you wore that day.
- Team Victories: Commemorate a local club’s championship season.
- Player Milestones: Honour a favourite player’s record-breaking performance or retirement.
Preserving Memories
- Timeless Keepsakes: Football shirts can be delicate. Framing protects them from wear and tear.
- Protection from Elements: UV rays and dust can degrade fabric over time. Framing provides a barrier.
- A Display of Fandom: Showcase your loyalty and passion for your team in a sophisticated way.
Choosing the Right Frame: The Foundation of Your Display
Selecting the correct frame is crucial for both the aesthetic appeal and the preservation of your football shirt. A good frame should complement the jersey, protect it, and fit seamlessly into your chosen space.
The Anatomy of a Football Shirt Frame
When considering how to mount a football jersey, think about the components that make up a quality frame:
- The Frame Material: Wood, metal, or plastic? Each has its pros and cons.
- Wood: Offers a classic, warm look. Available in various species and finishes. Can be heavier.
- Metal: Sleek and modern. Durable and less prone to warping. Might feel cooler to the touch.
- Plastic (Acrylic/Plexiglass): Lightweight and shatter-resistant. Often more budget-friendly. Can scratch more easily.
- The Frame Depth (Shadow Box): Football shirts have a natural bulk. You’ll need a frame with sufficient depth to avoid crushing the fabric. This is where a shadow box football shirt excels.
- The Glazing: What covers the shirt?
- Regular Glass: Standard, affordable. Can break easily.
- Acrylic/Plexiglass: Lighter, shatter-resistant. Good for larger pieces or areas where safety is a concern. Can scratch.
- UV-Protective Glass/Acrylic: Essential for preventing fading caused by sunlight. Highly recommended for valuable or vibrant jerseys.
- The Mount/Matting: This is the card or board that surrounds the jersey.
- Standard Mount: A single layer of card.
- Double/Triple Mount: Adds depth and visual interest.
- Coloured Mount: Choose colours that complement your jersey and your room. Acid-free and conservation-grade materials are vital for preserving football shirts.
Types of Frames for Football Shirts
The best way to frame a shirt often involves a sports jersey display case, which is essentially a deep shadow box designed specifically for this purpose.
- Shadow Box Frames: These are the most popular choice. They have a raised back, creating a space between the glazing and the shirt, which prevents the fabric from touching the glass and allows for a more layered presentation. This is ideal for a football shirt display that might include additional memorabilia.
- Deep-Set Frames: Similar to shadow boxes, these frames offer more depth than standard picture frames.
- Custom Football Shirt Frame: The ultimate solution. A custom football shirt frame is made to your exact specifications, ensuring a perfect fit and allowing for unique design elements, such as built-in shelves for smaller items or specially cut matting.
Preparing Your Football Shirt for Framing
Before you can mount a football jersey, proper preparation is key. This ensures the shirt looks its best and is protected for years to come.
Cleaning Your Jersey
- Gentle Wash: If the shirt is dirty, wash it according to the care label. Use a mild detergent and cool water.
- Avoid Harsh Chemicals: Bleach or strong stain removers can damage the fabric and colours.
- Hand Wash Preferred: For vintage or delicate shirts, hand washing is the safest option.
- Air Dry: Never put a jersey in a tumble dryer. Hang it or lay it flat to dry naturally. Ensure it’s completely dry before framing.
Handling and Positioning
- Clean Hands: Always handle the shirt with clean, dry hands. Consider wearing cotton gloves to prevent transferring oils.
- Ironing (Carefully): If the shirt is wrinkled, iron it on a low setting, preferably on the reverse side. Avoid ironing directly over any printed names, numbers, or sponsor logos, as this can melt or damage them. You might want to place a thin cloth between the iron and the shirt.
- Deciding on the Pose: How do you want the shirt to appear?
- Full Fold: Displaying the shirt neatly folded.
- Half Fold: Showing off the front and sleeve.
- Draped/Bunched: Creating a more dynamic, casual look. This often requires a bit more pinning or stitching.
- Displaying the Back: If the name and number are the main feature.
The Framing Process: Step-by-Step
Whether you opt for a professional service or decide on DIY football shirt framing, the core steps are similar.
Step 1: Gathering Your Materials
- The Frame: Chosen based on your shirt and décor.
- Mounting Board: Acid-free foam core or mat board.
- Adhesive: Archival quality spray adhesive, double-sided tape, or photo corners.
- Backing Board: Acid-free board for support.
- Mounting Pins/Needles: Fine sewing pins or specialized framing pins.
- Measuring Tape and Ruler: For accurate placement.
- Scissors or Craft Knife: For cutting mount board.
- Optional: Additional memorabilia (photos, tickets, coins).
Step 2: Preparing the Mount and Frame Interior
- Measure Your Shirt: Accurately measure the width and height of your folded or positioned shirt.
- Cut the Mount Board: Based on your measurements and the frame size, cut the mount board. This will create a border around your shirt. For a layered look, you might cut multiple mounts of decreasing size.
- Design Your Layout: Decide where the shirt and any additional items will be placed within the frame. Lay them out on the mount board before permanently attaching anything.
Step 3: Mounting the Shirt
This is where you mount a football jersey onto the prepared backing or mount board.
- Method 1: Stitching (Recommended for preservation)
- Secure the backing board to the frame’s backing.
- Carefully place the shirt on the mount board in your desired position.
- Using a fine needle and strong, neutral-coloured thread, stitch through the inside folds of the shirt and the mount board. This method avoids adhesives touching the shirt directly. Make stitches small and discreet, often through the thicker seams or less visible areas.
- Method 2: Adhesive Mounting
- Apply archival spray adhesive or double-sided tape to the back of the mount board where the shirt will be placed.
- Carefully position the shirt onto the adhesive, smoothing it down gently. Ensure no adhesive seeps through to the front. For a more secure hold on heavier shirts, you might use thin strips of double-sided tape along the edges on the back.
- Method 3: Interfacing/Stabilizing (For very fragile shirts)
- A thin layer of stabilizing fabric (like lightweight interfacing) can be ironed onto the back of the shirt using a low heat setting. This reinforces the fabric and provides a cleaner surface for mounting with adhesive. Always test this on an inconspicuous area first.
Step 4: Adding Extra Memorabilia
- If you are including photos, tickets, or other items, use photo corners or archival tape to attach them to the mount board around the shirt. Ensure everything is securely fastened and doesn’t overlap awkwardly.
Step 5: Assembling the Frame
- Clean the Glazing: Ensure the inside of the glass or acrylic is perfectly clean.
- Place the Mount: Carefully place the matted shirt and any extra items into the frame.
- Secure the Backing: Re-attach the frame’s backing board, ensuring it fits snugly.
- Seal the Frame: Use framing tape to seal the edges of the backing board to the frame. This prevents dust and insects from entering the case, further aiding in preserving football shirts.
Step 6: Final Touches
- Hardware: Attach appropriate hanging hardware to the back of the frame. Ensure it’s strong enough to support the weight of the framed shirt.
- Hanging: Choose a suitable location, away from direct sunlight and extreme humidity. Use a level to ensure your display hangs straight.
Professional Framing vs. DIY: Making the Choice
While DIY football shirt framing is achievable and cost-effective, professional framing offers a level of expertise and quality that can be hard to replicate at home.
Professional Framing Services
- Expertise: Professional framers have extensive knowledge of materials, techniques, and design.
- Quality Materials: They use conservation-grade materials that are best for long-term preservation.
- Specialized Equipment: Access to professional cutting tools, framing machines, and UV-filtering glass.
- Time-Saving: Frees up your time to focus on other aspects of your collection.
- Warranty: Many offer guarantees on their work.
When to Consider Professional Framing:
- For very valuable or rare shirts.
- If you lack confidence in your DIY skills.
- When you want a museum-quality finish.
- If the shirt is particularly delicate or complex to mount.
DIY Football Shirt Framing
- Cost-Effective: Significantly cheaper than professional services.
- Personal Satisfaction: The pride of creating your own football shirt display.
- Customization: Complete control over every aspect of the design.
- Learning Experience: Develop new skills in crafting and framing.
Key Considerations for DIY:
- Invest in Quality Tools: A good mat cutter and a steady hand are essential.
- Use Archival Materials: Don’t skimp on the quality of your mount board and adhesives. This is crucial for preserving football shirts.
- Patience is Key: Take your time with each step to ensure a clean, professional look.
Choosing the Perfect Location for Your Framed Shirt
Where you hang your framed jersey can make all the difference in its impact and its longevity.
Factors to Consider
- Sunlight Exposure: Direct sunlight is the enemy of colours. Opt for walls that don’t receive prolonged, direct sun. If you must hang it in a sunny spot, ensure you have UV-protective glazing.
- Humidity and Temperature: Avoid areas with high humidity (like bathrooms) or extreme temperature fluctuations (like attics or garages). Consistent, moderate conditions are best.
- Wall Space: Ensure you have adequate wall space and that the size of the framed shirt fits the scale of the room.
- Décor Integration: How will the framed shirt complement your existing décor? Consider the colours, style, and overall ambiance of the room.
Ideal Locations
- Man Cave/Sports Room: The obvious choice for a dedicated sports fan.
- Living Room: As a statement piece of art.
- Bedroom: A subtle nod to your passion.
- Office/Study: Adding personality and inspiration.
Elevating Your Football Shirt Display with Additional Memorabilia
A sports jersey display case isn’t just for the shirt itself. Incorporating other related items can create a richer, more engaging narrative.
What to Include
- Match Tickets: The stub from the game where the shirt was worn or a significant victory.
- Photographs: Action shots from the game, the player in the shirt, or the team celebrating.
- Player Signatures: If the shirt is signed, ensure the signature is visible and protected.
- Coins or Medals: Commemorative coins or small medals related to a specific season or event.
- Newspaper Clippings: Articles about significant matches or player achievements.
Design Tips for Mixed Memorabilia
- Balance: Don’t overcrowd the frame. Let the shirt remain the primary focus.
- Storytelling: Arrange items to tell a clear story. Chronological order can work well.
- Mounting: Use acid-free mats with custom cut-outs for photos or tickets to keep them neat and secure.
- Depth: Utilize the space within a shadow box football shirt to layer items effectively.
Frequently Asked Questions (FAQ)
Q1: How much does it cost to frame a football shirt professionally?
A1: Professional framing costs can vary widely, from $150 to $500 or more, depending on the complexity, materials used (like UV-protective glass), and the size of the shirt. A custom football shirt frame will typically be at the higher end of this range.
Q2: Can I frame a shirt without it being sewn or glued?
A2: Yes, the most common and recommended method for preserving football shirts is to stitch it to the mount board using fine needles and thread. This avoids any adhesives touching the fabric directly. You can also use archival mounting strips or photo corners.
Q3: What is the best way to protect a framed shirt from fading?
A3: The most effective way is to use UV-protective glass or acrylic in your frame. Also, avoid hanging the framed shirt in direct sunlight.
Q4: Do I need a special frame for a football shirt?
A4: Yes, you generally need a “shadow box” or a deep-set frame. Standard flat frames are too shallow to accommodate the bulk of a folded or mounted shirt without crushing it against the glass. A sports jersey display case is specifically designed for this purpose.
Q5: Can I frame a signed football shirt?
A5: Absolutely! Framing a signed shirt is a great way to protect and display a valuable piece of memorabilia. Ensure the signature is handled carefully and ideally protected by the glazing.
Q6: What kind of materials should I use for DIY framing to ensure longevity?
A6: For DIY football shirt framing, always use acid-free and archival quality materials for your mount boards, backing, and any adhesives or tapes. This prevents yellowing and damage to the shirt over time.
Q7: How do I make sure my shirt lays flat in the frame?
A7: You can gently stitch the shirt to a backing board or use archival mounting strips along the seams or less visible areas. Some people also use thin, archival foam board as an inner support for the shirt to help it maintain its shape.
Q8: Can I frame a shirt with the sleeves extended?
A8: Yes, this is possible, but it requires a larger frame and careful positioning. You might need to slightly pad out the sleeves to give them shape. This often looks best when the shirt is partially open at the neck.
Mastering the art of framing a football shirt allows you to create a unique and personal tribute to your sporting passion. By carefully selecting your materials, preparing your jersey, and employing the right mounting techniques, you can transform a simple piece of sportswear into a treasured work of art that will be admired for years to come. Whether you choose a professional service or embark on a DIY football shirt framing adventure, the end result will be a stunning football shirt display that celebrates the beautiful game.