
Image Source: www.oralmart.com
How To Mold A Football Mouth Guard: Step-by-Step
Can you mold a football mouth guard at home? Yes, you can mold a football mouth guard at home using a simple process called “boil and bite.” This method allows you to create a custom fit, which is essential for effective protection and comfort during play.
A football mouth guard is a crucial piece of protective gear for any player. It safeguards your teeth, jaw, and even helps prevent concussions. While off-the-shelf mouth guards offer basic protection, a properly molded one provides a significantly better fit and superior safety. This guide will walk you through the entire process of mouthguard molding at home, ensuring you get the best possible protection for your next game. We’ll cover everything from the types of mouth guards suitable for molding to the step-by-step process, common mistakes to avoid, and how to care for your newly molded mouth guard.
Why a Custom Fit Matters for Football Mouth Guards
The effectiveness of a football mouth guard hinges on its fit. A mouth guard that is too loose can easily fall out during impact, leaving your teeth vulnerable. Conversely, a mouth guard that is too tight can be uncomfortable, make breathing difficult, and even interfere with speech. A “boil and bite” mouth guard, when molded correctly, creates a custom fit by adapting to the unique shape of your teeth and gums. This snug fit ensures the mouth guard stays in place, absorbs shock more effectively, and provides the best possible jaw protection.
Types of Mouth Guards and Which Ones You Can Mold
Not all mouth guards are created equal, and importantly, not all are designed for at-home molding.
-
Stock Mouth Guards: These are the cheapest and most widely available. They come pre-formed and offer minimal customization. You essentially just bite down on them. They provide very basic protection and are not moldable.
-
Boil and Bite Mouth Guards: This is the type of mouth guard we’ll be focusing on. They are made from a thermoplastic material that softens when heated in boiling water. Once softened, you bite down on them to create a custom impression of your teeth. These are widely available at sporting goods stores and offer a good balance of affordability and protection.
-
Custom-Fitted Mouth Guards: These are professionally made by dentists or dental labs using a precise dental impression. They offer the ultimate in fit and protection but are significantly more expensive. While you can’t make a truly “custom-fitted” mouth guard at home in the same way a dentist does, the “boil and bite” process gets you very close.
For the purpose of this guide, we are exclusively discussing the boil and bite method.
Essential Tools for Mouthguard Molding
Before you begin, gather all the necessary materials. Having everything ready will make the mouthguard molding process smoother and more successful.
- Your Boil and Bite Mouth Guard: Ensure it’s specifically designed for sports and the “boil and bite” process.
- A Pot for Boiling Water: A small saucepan is ideal.
- A Heat-Resistant Spoon or Tongs: For safely handling the hot mouth guard.
- A Bowl of Cold Water: For cooling the mouth guard after heating.
- A Mirror: To help you position the mouth guard correctly.
- Water Source: For filling the pot and bowl.
- A Timer or Clock: To accurately time the heating and cooling processes.
- Optional: A Small Knife or Scissors: For trimming any excess material if needed.
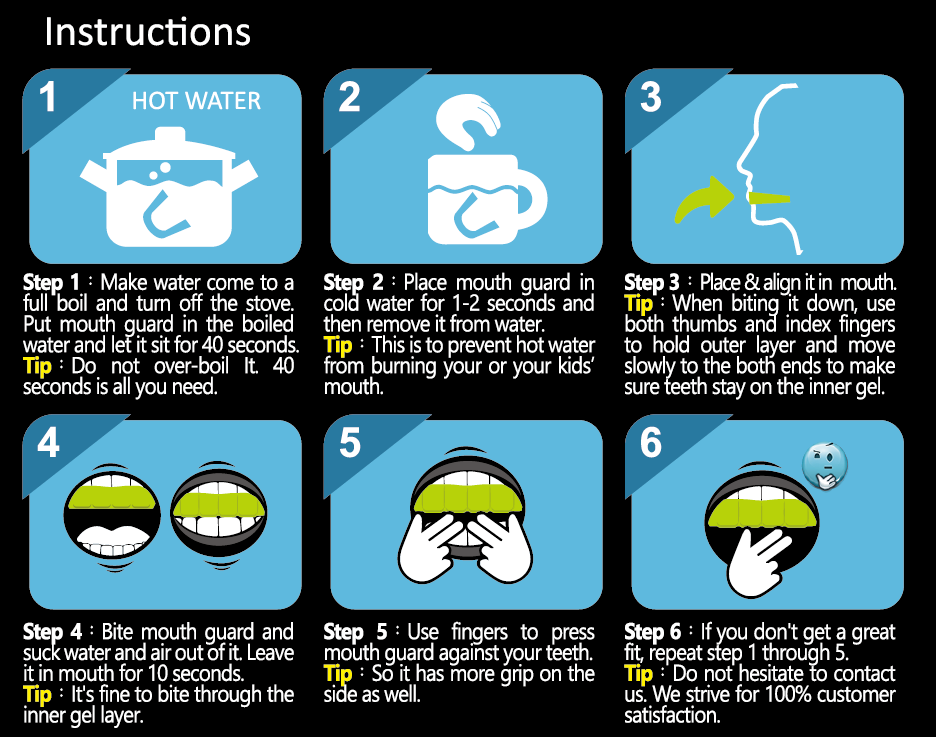
The Mouthguard Molding Process: Step-by-Step
Follow these steps carefully to achieve a secure and protective fit for your football mouth guard. Patience and precision are key here.
Step 1: Prepare Your Workspace and Mouth Guard
- Clear and Clean Area: Find a clean, dry surface to work on. Ensure your hands are clean.
- Inspect the Mouth Guard: Check the mouth guard for any defects or damage.
- Read Instructions: Most boil and bite mouth guards come with specific instructions. It’s always best to read these first, as there might be slight variations in recommended heating times.
Step 2: Heating the Mouth Guard
This is the most critical step. Overheating can melt the mouth guard, making it unusable, while underheating will prevent it from molding properly.
- Boil Water: Fill your pot with enough water to fully submerge the mouth guard. Bring the water to a rolling boil.
- Reduce Heat: Once boiling, reduce the heat to a simmer. You don’t want violently boiling water, as this can be dangerous and damage the thermoplastic.
- Submerge the Mouth Guard: Using your heat-resistant spoon or tongs, carefully place the mouth guard into the simmering water. Make sure it’s fully submerged.
- Time the Heating: This is where reading the mouth guard’s specific instructions is vital. Generally, mouth guards need to be heated for 30 to 60 seconds. Do NOT leave it in longer than recommended. The thermoplastic should become pliable, not completely melted or deformed.
Step 3: The Molding Process – Creating Your Custom Fit
This step requires quick and precise action.
- Remove from Water: Carefully remove the mouth guard from the hot water using your spoon or tongs. Let any excess water drip off, but work quickly before it cools too much.
- Check Temperature: Briefly touch the mouth guard (carefully!) to ensure it’s not too hot to handle. It should be warm and pliable, not scalding.
- Position the Mouth Guard: Place the mouth guard onto your upper teeth. Position it so that it sits comfortably and covers your teeth as intended. Most boil and bite mouth guards have a specific side for the upper teeth.
- Bite Down Firmly: Gently but firmly bite down into the mouth guard. Use your fingers to press the mouth guard against your teeth and gums from the outside.
- Suck in Air: While biting down, suck in air forcefully. This creates a vacuum effect, helping the mouth guard conform tightly to your teeth.
- Mold with Fingers: Use your fingers to press the mouth guard around your teeth and gums, both on the outside and inside. Pay attention to the gum line and the roof of your mouth.
- Hold Position: Maintain this biting and molding position for 30 to 60 seconds, or until the mouth guard feels set.
Step 4: Cooling and Setting the Mold
- Remove from Mouth: Carefully remove the molded mouth guard from your mouth.
- Submerge in Cold Water: Immediately place the molded mouth guard into the bowl of cold water. This will help it cool down and set the custom shape. Leave it in the cold water for at least 1 minute.
Step 5: Testing the Fit
- Try It On: Once cooled, try the mouth guard back on. It should feel snug and secure.
- Check for Stability: Move your jaw around. The mouth guard should stay in place without you needing to bite down constantly. It should also not feel loose or likely to fall out.
- Breathing and Speech: Ensure you can breathe comfortably and speak intelligibly with the mouth guard in.
Step 6: Trimming Excess Material (If Necessary)
If there’s any uncomfortable excess material, particularly around the edges, you can carefully trim it with a small knife or sharp scissors. Do this after the mouth guard has completely cooled and set. Trim small amounts at a time and re-test the fit.
What to Do If the Fit Isn’t Right
Don’t despair if the first molding attempt isn’t perfect. Most boil and bite mouth guards can be re-molded.
- Too Loose: If the mouth guard feels too loose, it likely wasn’t molded tightly enough or the thermoplastic cooled too much before you could properly shape it. Repeat the boiling and molding process, focusing on biting down firmly and sucking in air.
- Too Tight/Uncomfortable: If it’s too tight or uncomfortable, you might have bitten down too hard initially or not molded it correctly around your teeth. Re-boil and try to mold it again, paying attention to gentle pressure rather than brute force. Ensure you’re not biting through the material.
- Uneven Fit: If one side is better than the other, focus on applying more pressure to the less-molded side during the second attempt.
Important Note: Check the manufacturer’s instructions regarding the number of times a mouth guard can be re-molded. Typically, two to three attempts are possible.
Caring for Your Molded Mouth Guard
Proper care will extend the life and effectiveness of your protective gear.
- Rinsing: Always rinse your mouth guard with cool water after each use. This removes saliva and debris.
- Cleaning: Wash your mouth guard with mild soap and cool water. Avoid hot water, as it can warp the thermoplastic.
- Drying: Allow the mouth guard to air dry completely before storing it.
- Storage: Store your mouth guard in its protective case. This prevents it from picking up dirt, bacteria, or damage. Keep it away from direct sunlight and heat, as this can cause it to warp.
- Regular Inspection: Periodically check your mouth guard for any signs of wear and tear, such as cracks or thinning. If you notice any damage, it’s time to replace it.
Common Mistakes During Mouthguard Molding
Avoiding these common pitfalls will significantly improve your chances of a successful molding.
- Overheating: Leaving the mouth guard in boiling water for too long can cause it to melt, lose its shape, and become unusable.
- Underheating: Not heating it long enough will result in a mouth guard that is too stiff to mold effectively, leading to a poor fit.
- Working Too Slowly: The thermoplastic cools quickly. If you take too long between removing it from the water and molding it, it won’t shape properly.
- Not Biting Firmly Enough: Insufficient biting pressure will lead to a loose fit.
- Not Sucking in Air: This step is crucial for creating a tight, vacuum-sealed fit.
- Molding the Wrong Teeth: Ensure you are molding the mouth guard to your upper teeth only, as per standard practice for football.
- Biting Through the Material: While firm biting is necessary, biting with excessive force can puncture or significantly thin the mouth guard, compromising its protective qualities.
- Ignoring Manufacturer Instructions: Always defer to the specific instructions provided with your particular mouth guard.
The Science Behind Boil and Bite: Thermoplastic Properties
The “boil and bite” technology relies on the properties of thermoplastic materials. Thermoplastics are polymers that become soft and moldable when heated and then harden when cooled. This reversible process allows you to shape the material to a specific form.
When you immerse the mouth guard in hot water, the polymer chains within the thermoplastic gain enough kinetic energy to move past each other. This makes the material flexible and pliable. As you bite down and press the material, you are essentially forcing these polymer chains to arrange themselves around the contours of your teeth and gums. When you then cool the mouth guard in water, the polymer chains lose kinetic energy and lock into this new shape, creating a custom fit.
This process leverages basic principles of material science to create personalized protective gear. The ability to create a dental impression with thermoplastic is what distinguishes these mouth guards from simpler, pre-formed options.
Mouthguard Molding and Jaw Protection
Proper molding is not just about comfort; it’s directly linked to enhanced jaw protection. A well-molded mouth guard distributes the force of an impact across a larger surface area, including your teeth, gums, and the alveolar bone that supports your teeth. This distribution significantly reduces the localized stress on individual teeth and can help prevent jaw fractures and dislocations.
When a mouth guard fits poorly, it can create pressure points, potentially leading to injury rather than preventing it. The snug fit achieved through the mouthguard molding process ensures that the mouth guard stays in position to effectively absorb and dissipate impact energy, protecting the entire oral structure.
Frequently Asked Questions About Molding Football Mouth Guards
Here are some common questions people have about molding their mouth guards:
Q1: How long should I heat the mouth guard?
A1: This varies by brand, but typically it’s between 30 to 60 seconds in simmering water. Always check the manufacturer’s instructions.
Q2: Can I use boiling water from the tap to mold it?
A2: It’s best to bring fresh water to a boil and then reduce it to a simmer. Water from a tap that has been sitting in a hot water heater might contain minerals that could affect the molding process or the mouth guard.
Q3: My mouth guard feels too hard to mold. What did I do wrong?
A3: You likely didn’t heat it long enough. Re-boil it for a slightly longer period (but still within the recommended time frame) and try again.
Q4: My mouth guard melted. What happened?
A4: You probably overheated it. The water might have been too hot, or you left it in the water for too long. Discard the melted mouth guard and start with a new one, being careful with the heating time.
Q5: How do I know if I have the correct dental impression?
A5: The mouth guard should feel snug, with each tooth clearly imprinted. It shouldn’t wiggle or fall out when you open your mouth. You should be able to speak with it in, although clarity might be slightly reduced.
Q6: Can I mold a mouth guard for my lower teeth?
A6: While some mouth guards are designed for lower teeth, standard football mouth guards are typically molded for the upper teeth. Always check the product description and instructions.
Q7: How often should I replace my molded mouth guard?
A7: It’s recommended to replace your mouth guard every season, or sooner if it shows signs of wear and tear, such as thinning, tears, or a loose fit.
Q8: What is the difference between this and a professionally made mouth guard?
A8: Professionally made mouth guards are created from a precise dental impression taken by a dentist. This results in a superior fit, greater comfort, and often better breathability and speech clarity. However, boil and bite mouth guards offer a significant improvement over stock mouth guards at a much lower cost.
Conclusion
Molding your football mouth guard using the boil and bite method is a straightforward yet crucial step in ensuring optimal protection on the field. By following these detailed steps, you can achieve a custom fit that enhances comfort, improves performance, and most importantly, provides superior jaw protection. Remember to always prioritize safety by using caution with hot water and adhering strictly to the manufacturer’s instructions. A well-molded mouth guard is an investment in your health and a vital piece of sports equipment for any serious football player.