
What is toddler choking first aid? Toddler choking first aid means fast actions to clear their airway when food or an object blocks it. Can I give back blows for toddlers? Yes, back blows are a main way to help a choking toddler. Who is a choking hazard for toddlers? Many small items and foods are choking hazards for toddlers, like grapes, hot dogs, or small toys. Knowing what to do in a pediatric choking emergency is very important for parents and caregivers. This guide will walk you through the steps to help a choking toddler, from seeing the signs of choking in toddlers to what to do if they become unresponsive. Acting fast can save a child’s life.
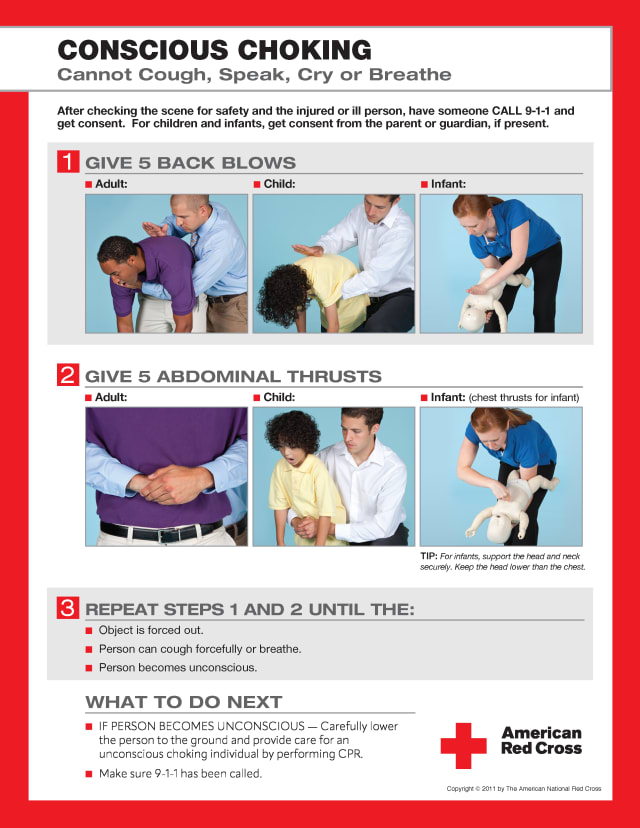
Image Source: res.cloudinary.com
Grasping the Urgent Nature of Choking
Choking is a top worry for parents of young children. Toddlers often explore the world by putting things in their mouths. Their small airways can easily get blocked. This blockage stops air from reaching their lungs. It is a true emergency. Every second counts. Knowing how to act can make all the difference. This guide will give you clear steps. You will learn what to do right away. This knowledge makes you ready. You can help your child if they choke.
Seeing the Signs of Choking in Toddlers
How do you know if a toddler is choking? It is not always obvious. Sometimes, a child might cough. They might gasp. This is a partial airway obstruction toddler. Air can still get through a little. Other times, the airway is fully blocked. This is much more serious.
Here are key signs to watch for:
- Silent Choking: The child cannot cough or make any sound. They cannot cry or speak. This is a very bad sign.
- Struggling to Breathe: They might make soft sounds. They might try to gasp for air. Their breathing will be hard.
- Blue Skin: Their lips, face, or nails might turn blue or pale. This means they are not getting enough oxygen.
- Panic: The child will look scared or upset. Their eyes might widen.
- Clutching Throat: Older toddlers might grab their throat. This is a universal sign of choking.
- Losing Consciousness: If not helped, they will go limp. They will become unresponsive.
If you see these signs, act fast. Do not wait to see if it gets better. This is a pediatric choking emergency. You need to start toddler choking first aid right away.
First Aid for a Conscious Choking Toddler
If your toddler is choking but still awake, you need to follow a clear plan. This plan involves two main actions: back blows and chest thrusts. These are done in a cycle. The goal is to push the object out.
Hitting the Right Help: Calling for Help
The very first step is to call for help. If you are alone, yell for someone. If someone else is there, tell them to call 911 (or your local emergency number). Tell them a child is choking. Do not leave the child alone to call. Start first aid right away. If you are alone and the child becomes unresponsive later, you will call 911 then.
Back Blows for Toddlers: How to Do Them
Back blows are strong slaps to the back. They aim to push the object out.
- Position the Child:
- Lay the toddler face down along your forearm.
- Your forearm rests on your thigh.
- Make sure their head is lower than their chest.
- Support their head and neck with your hand. Do not cover their mouth or nose.
- Deliver the Blows:
- Use the heel of your other hand.
- Give 5 quick, firm back blows.
- Aim between the toddler’s shoulder blades.
- Make each blow a clear, separate effort.
- Check after each blow if the object came out.
- Do not stop if the object comes out. Check their mouth. Remove the object if you see it. Only remove it if you can see it and grab it easily. Do not use your fingers to blindly sweep. This might push the object further down.
If the object does not come out after 5 back blows, move to chest thrusts.
Chest Thrusts for Toddlers: How to Do Them
Chest thrusts are like CPR compressions but slower and deeper. They aim to push the air out of the lungs. This air can dislodge the object.
- Position the Child:
- Turn the toddler face up.
- Keep their head lower than their chest.
- Rest them along your other forearm, still on your thigh.
- Support their head and neck.
- Find the Spot:
- Place two fingers in the center of their chest.
- Put them on the breastbone.
- This is just below the nipple line.
- Deliver the Thrusts:
- Give 5 quick, firm chest thrusts.
- Push straight down about 1.5 inches (4 cm).
- Let the chest rise fully after each thrust.
- Make each thrust a clear, separate effort.
- Check after each thrust if the object came out.
The Cycle of 5-and-5
Keep doing 5 back blows and 5 chest thrusts. Do not stop. Keep going until:
* The object comes out.
* The toddler starts to cough strongly.
* The toddler starts to breathe, cry, or talk.
* The toddler becomes unresponsive.
If the toddler becomes unresponsive, you need to change your actions. This is a critical point.
What to Do if a Toddler Becomes Unresponsive While Choking
An unresponsive choking toddler is a very serious situation. This means the child has lost consciousness. Their body has gone limp. They are not breathing. You must call 911 right away if you have not already. Then, start CPR for choking child.
Starting CPR for Choking Child
CPR stands for Cardiopulmonary Resuscitation. It combines chest compressions and rescue breathing. The steps are slightly different for a choking child.
- Call 911: If you are alone and the child becomes unresponsive, call 911 now. Put the phone on speaker if you can. Or, make the call quickly and then start CPR.
- Lay the Child Flat: Gently place the child on a firm, flat surface. This can be the floor or a table.
- Open the Airway (Quick Look):
- Gently tilt their head back a little. Lift their chin. This opens the airway.
- Look inside their mouth. Do you see the object?
- If you see the object and can easily grab it, remove it. Use your finger like a hook. Be very careful not to push it further down.
- Do not do a blind finger sweep. Only remove what you can clearly see and grab.
- Give 2 Rescue Breaths:
- Pinch their nose shut.
- Place your mouth over their mouth. Make a good seal.
- Give 2 slow breaths. Each breath should make their chest rise.
- If the chest does not rise, reposition the head and try again. The airway might not be open.
- If the breaths still do not go in, the airway is blocked.
Compressions for an Unresponsive Choking Toddler
If the rescue breaths do not go in, or if the child is still unresponsive after clearing their mouth, start chest compressions.
- Hand Position:
- Place the heel of one hand in the center of their chest.
- This is just below the nipple line, on the breastbone.
- You can use two fingers if the child is very small.
- Compressions:
- Give 30 compressions.
- Push down about 2 inches (5 cm).
- Push hard and fast.
- Aim for 100-120 compressions per minute.
- Let the chest come all the way up after each push.
The Cycle of CPR
After 30 compressions:
* Open the airway again.
* Look inside the mouth for the object. If you see it and can grab it easily, remove it.
* Give 2 rescue breaths.
Continue this cycle: 30 compressions, then check for the object, then 2 breaths. Keep going until:
* The object comes out.
* The toddler starts to breathe on their own.
* Help arrives (like paramedics).
Do not stop until help takes over or the child starts to breathe. This is a vital part of pediatric choking emergency response.
Rescue Breathing for Toddler Choking: Key Points
Rescue breathing is often a part of CPR. When a child is choking and then goes unresponsive, giving breaths can be tricky. This is because the airway is blocked.
- Do Not Force Air: Do not try to blow air in too hard. This will not help. It might even harm the child.
- Look for Chest Rise: After you give a breath, watch their chest. Did it rise? If not, the airway is still blocked.
- Reposition Head: If the chest does not rise, try tilting the head slightly again. This might open the airway.
- Airway Obstruction Toddler: If breaths still do not go in, it confirms a severe airway obstruction toddler. Keep doing chest compressions. The compressions are key. They build pressure in the chest. This pressure might push the object out.
Remember, the goal of rescue breathing in this case is not just to get air in. It is also to check if the airway is clear enough for air to pass.
Important Notes on Toddler Choking First Aid
- Stay Calm: This is hard. But staying calm helps you think clearly. It helps you follow the steps correctly.
- Do Not Hang Child Upside Down: Do not shake the child. Do not hang them upside down. This can make things worse.
- Do Not Try to Grab Unless You See It: Do not sweep your finger blindly in the mouth. This can push the object deeper. Only remove what you can see and grab easily.
- Call 911 Even If Object Comes Out: If the child was choking severely, or became unresponsive, always get medical help. Even if the object comes out, they need to be checked. There could be damage inside. They might need a doctor to look at their lungs or throat.
Preventing Choking: Reducing Choking Hazards Toddler
Prevention is always best. Many choking hazards for toddlers can be avoided. Toddlers are still learning to chew and swallow. Their small windpipes make them prone to choking.
Here are ways to make your home safer:
Foods to Avoid or Change for Toddlers
- Whole Grapes: Cut them in half or quarters lengthwise.
- Hot Dogs: Slice them lengthwise first, then into small pieces.
- Large Meat Chunks: Cut meat into very small, bite-sized pieces.
- Hard Candies, Gum, Popcorn, Nuts, Seeds: Avoid these for children under 4.
- Peanut Butter (large dollops): Spread thinly on toast or crackers. A big lump can stick.
- Marshmallows: Cut into small pieces or avoid. They can be sticky and hard to chew.
- Raw Carrots, Apples, Celery: Grate them, cook them soft, or cut into tiny pieces.
- Cherry Tomatoes: Cut into halves or quarters.
Toys and Household Items to Watch Out For
- Small Toys: Anything smaller than a toilet paper roll opening is a risk. Check toys for small parts.
- Balloons: Uninflated or broken balloons are very dangerous. Keep them away from toddlers.
- Coins, Marbles, Buttons, Beads: Store these out of reach.
- Pen Caps, Bottle Caps: These are common choking hazards.
- Magnets: Small magnets are very dangerous if swallowed. They can stick together inside the body. This can cause severe harm.
- Batteries: Especially small button batteries. These are a major hazard. They can cause burns if swallowed.
- Pet Food: Keep pet bowls out of reach.
- Pillows and Blankets: For very young toddlers, too many soft items in a crib can be a suffocation risk, which is related to airway safety.
Eating Habits and Supervision
- Always Supervise: Never leave a toddler alone while they are eating.
- Sit Down to Eat: Encourage children to sit still while eating. Running or playing with food raises the risk of choking.
- Cut Food Properly: Always cut food into small, manageable pieces.
- Teach Chewing: Teach your child to chew food well.
- Model Good Eating: Show them how to eat slowly and carefully.
When to Seek Medical Help After a Choking Incident
Even if the object comes out and your child seems okay, a doctor should check them. This is true for any pediatric choking emergency.
- After any severe choking episode: Even if the object is cleared, there could be internal damage.
- If the child needed back blows or chest thrusts: These can be forceful. A doctor can check for bruises or other harm.
- If you suspect part of the object is still there: Sometimes, a small piece might remain.
- If the child has a persistent cough, wheezing, or difficulty breathing later: These are signs they need medical care.
- If the child becomes unresponsive: Always get emergency care.
A doctor can make sure no further harm was done. They can also ensure the child’s lungs are clear.
A Quick Review of Key Steps
Helping a choking toddler can feel scary. But having a plan makes it easier.
If the toddler is CONSCIOUS (awake):
1. Call for help. Yell for someone to call 911.
2. Give 5 back blows.
* Position: Face down on your forearm, head lower than chest.
* Action: 5 firm blows between shoulder blades.
3. Give 5 chest thrusts.
* Position: Face up on your forearm, head lower than chest.
* Action: 5 firm thrusts with two fingers on breastbone.
4. Repeat 5 back blows and 5 chest thrusts until object comes out or child becomes unresponsive.
If the toddler is UNRESPONSIVE (not awake):
1. Call 911 right away.
2. Place child on a firm, flat surface.
3. Open airway, look for object. Remove if visible and easy to grab.
4. Give 2 rescue breaths. Watch for chest rise.
5. If breaths don’t go in, start 30 chest compressions.
6. Repeat cycle: Open airway, look, 2 breaths, 30 compressions. Keep going until help arrives or child breathes.
Remember, every step is important. Doing something is always better than doing nothing.
Frequently Asked Questions (FAQ)
Q1: How can I tell the difference between choking and gagging?
A1: Gagging often involves loud noises, coughing, and spitting. The child might turn red. Air can still move. Choking, especially severe choking, is often silent. The child cannot make sounds or cough. Their lips might turn blue. If they are silent and cannot breathe, it’s choking.
Q2: What is the age range for toddler choking first aid?
A2: These methods (back blows and chest thrusts) are for children aged 1 year to puberty. For infants (under 1 year), there are slight differences in technique. For older children and adults, you would use abdominal thrusts (Heimlich maneuver).
Q3: Can I hurt my child by giving back blows or chest thrusts?
A3: While it’s possible to cause minor injury (like bruising), the risk of not acting is far greater. A child who is choking severely needs immediate help to save their life. The techniques are designed to be effective and as safe as possible in an emergency.
Q4: Should I try to reach into my toddler’s mouth to pull out the object?
A4: Only if you can clearly see the object and grab it easily. Never do a blind finger sweep. You could push the object deeper into the airway. This can make the situation much worse.
Q5: What if the object comes out but my child is still not breathing normally?
A5: Even if the object comes out, you should still call 911 or get medical help. If the child is not breathing normally, or if they are still unresponsive, start CPR (chest compressions and rescue breathing) as outlined above, until help arrives.
Q6: Where can I learn more about pediatric first aid?
A6: You can take a certified first aid and CPR class. Organizations like the American Heart Association (AHA) and the American Red Cross offer these courses. They teach hands-on skills for infant, child, and adult emergencies. This practical training is very helpful.
Final Thoughts
Helping a choking toddler is a critical skill. It can feel scary. But by knowing the right steps, you can act quickly and surely. Remember the signs of choking. Practice the steps in your mind. Keep your home safe from choking hazards. Your readiness can make all the difference in a child’s life. Always call 911 in a true emergency. Even if the child seems fine after, a doctor should always check them. Your quick action is vital.